Hello everyone! *insert face of shame*. Well. Apparently I needed a break and perhaps I'm still on one but I couldn't resist sharing today's efforts. I picked up the OPI Vintage Minnie Minis from David Jones a few weeks ago and while I've made a few posts on Instagram (my latest obsession) I did my first nail art in months today.

All photos were taken and edited on my phone (I have an old crappy iPhone 3GS but I love it to bits) so excuse the quality.


All photos were taken and edited on my phone (I have an old crappy iPhone 3GS but I love it to bits) so excuse the quality.

This is the original colouring / no filter version. Unfortunately there was no "anti-aging/anti-winter cracked fingers filter" :-(

The Minnie minis set contains 3 Minnie polishes and a mini top coat. Yep, a RapiDry instead of the gorgeous glitter polish with heart glitter that I had to go buy separately. Poor form OPI. I purchased a full size of the glitter and the pink used in the second photo:

Left to right we have The Color of Minnie (a shimmery red used in the bows for this nail art), If You Moust You Moust (opaque bubblegum pink also used as a base for my nails), I'm All Ears (a pink/red shimmer) and a RapiDry. I have full sized If You Moust You Moust and Nothin' Mousie 'Bout It (pale pink glitter with heart confetti). While I'm on the subject of the heart confetti, I *knew* it would be a pain to work with from my experience with the Nicole by OPI version, but it was pink and pretty so I had to have it.

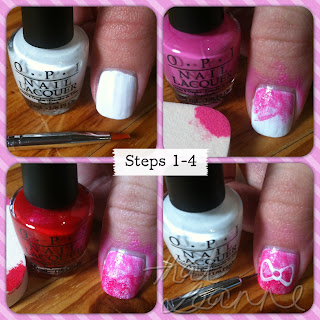
So today I felt like sponging and this is what I was working with. A dotting tool, two nail art brushes (the bigger one for cleaning up the nails and fingers), a makeup sponge, 3 OPI colours (The Color Of Minnie, Alpine Snow and If You Moust You Moust), acetone and a make up remover pad.

I started with the thumb before I changed my design - originally I sponged The Colour of Minnie at the bottom of my nail but I decided I liked the white contrast better. I always draw the outlines of my bows first. Even though it takes so long I always do them the same - outline then fill, then fill again! I'm not very good at sponging but I'm determined to practise!

By about step 7 I'm shaky and cranky but it's all worth it in the end!

I couldn't resist a creepy Minnie shot ;-) I picked her up in Disneyland last year and had no idea she would be so useful for nail art! Anyway I hope you enjoyed the nail art, and I hope you all have a lovely week!
P.S. If anyone is interested, the iPhone apps that I used to make this blogpost were Hipstamatic, PicFrame, Picfx and A+ Signature. I took SLR photos but I really am lazy so they are still on my camera...
You have read this articleNail Art /
Nail Tools /
OPI
with the title Minnie Mouse Bow Nail Art!. You can bookmark this page URL http://grluwilbok86.blogspot.com/2012/09/minnie-mouse-bow-nail-art.html. Thanks!
Write by:
Dj Donk - Sunday, September 2, 2012

.jpg)


Comments "Minnie Mouse Bow Nail Art!"
Post a Comment