Showing posts with label Tutorial. Show all posts
Thursday, April 4, 2013

Fireflies inspired nail Tutorial feat. Orly Glowstick

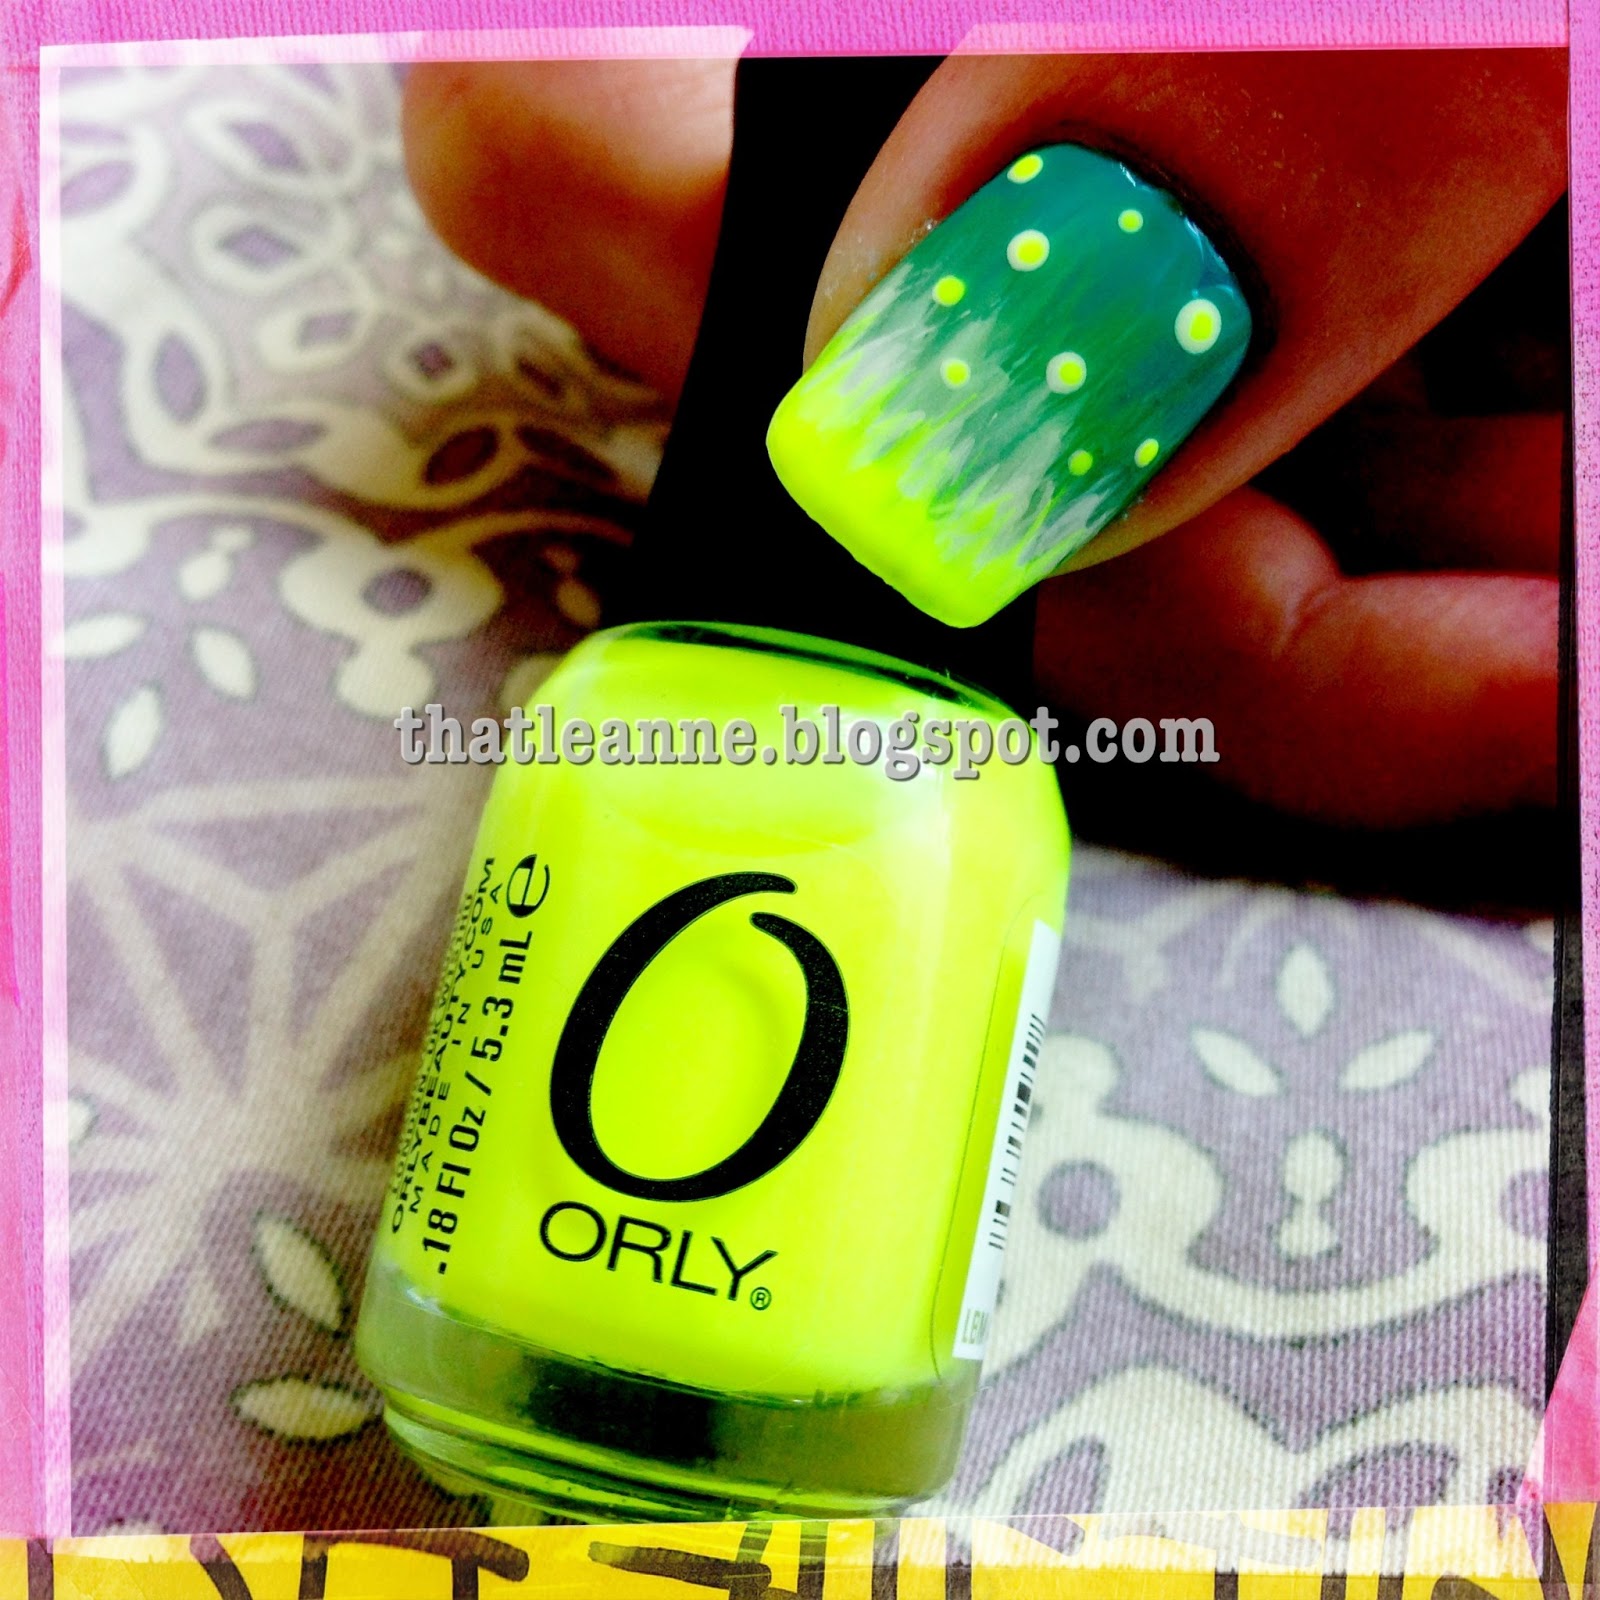
Recently I purchased 3 very neon Orly polishes from the 2012 Feel The Vibe collection. I did not know about this collection, I was picking up some medicine from the pharmacy and low and behold there was a new mini Orly polish stand at the check out. Convenient location. I spent more on Orly polishes than I did on medicine of course ;-) I picked up 3 from the collection, one being a bright fluoro yellow called Glowstick. And still in the butter London mood, I paired it with Slapper from the 2012 spring collection (we will not discuss how I managed to purchase Slapper twice accidentally):


In my mind I was picturing a beautiful field of glowing fireflies but on nails I can't decide if it looks like the fireflies I had in mind.... or a bubbling pit of doom :-D And if you think this looks familiar, you'd be right, it is a neon recreation of my loved Purple Starry Nights Tutorial. That fan brush had to get some use again :-)


So to recreate this firefly/bubbling pit look we need a neon yellow, and a variety of mint polishes. And for someone who really doesn't fancy mint colours, I seem to own quite a few:


Left to right we have butter London Fiver, OPI Mermaid's Tears, Essie Absolutely Shore, MAC Ocean Dip, Orly Glowstick, butter London Slapper and Orly Alpine Snow. You probably don't need this many, I just grabbed all I could locate. Mermaid's Tears and Ocean Dip are probably interchangeable. Probably don't even need Absolutely Shore but use as many as you like! The effect is discreet in the end.

Let's begin the tutorial! All steps were shot in the iPhone app Hipstamatic, check it out, it's a fab app for lazy "photographers" like myself.


Step 1: Paint your base coat. I chose butter London Slapper from the 2012 Spring Collection. Honestly photos do not do this polish justice. I took photos with a variety of lights with both my phone and SLR and none could show its true beauty. All I can say is to buy it if you like Teal colours. It also applied beautifully. It's dark and not really a Tiffany comparison but it's pretty. Enough said.


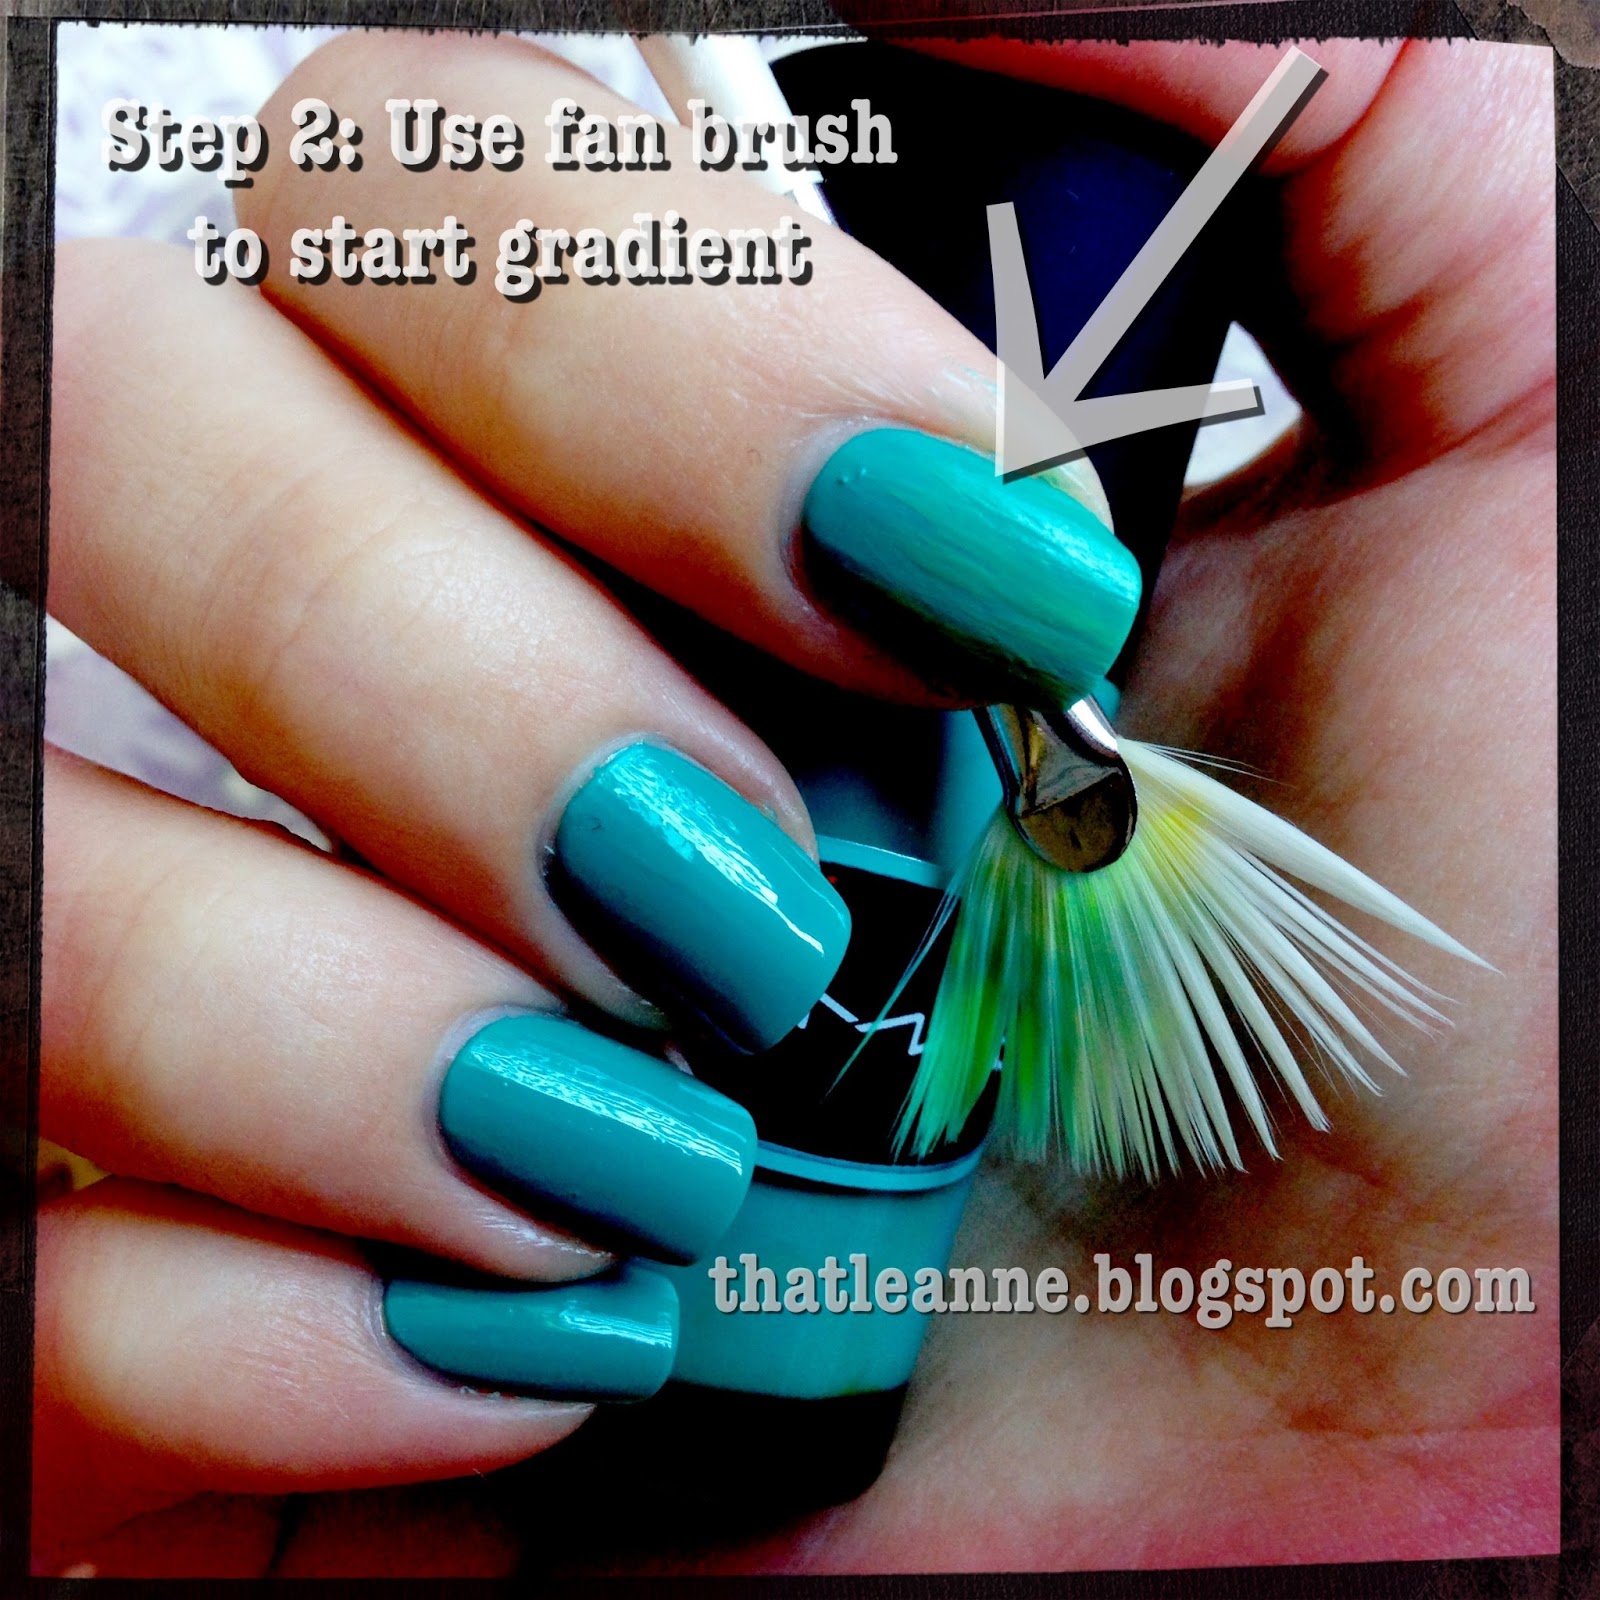
Step 2: Take a fan brush and paint a little on the edges and create downward strokes on the nail. The MAC colour is really subtle against Slapper hence the large arrow above. It's also only on one nail.


Step 3: Continue the fan gradient with another lighter colour. Clean and re-fan your brush regularly otherwise it'll stick together.


Step 4: Repeat step 3 with a lighter colour! Here we have Fiver from the Spring 2013 collection.


Step 4 continued - keep going with as many colours as you like! I clearly have too much time on my hands.


Step 5: Finish with a white fan brush coat. This is important as it enables the neon shade to look opaque and bright.


Step 6: Using a dotting tool (I use the Orly brand) to create different sized dots across the nails. They too will be a base for the neon yellow. Use both sides of the dotter and apply more/less polish for different sizes.


Step 7: Go over the dots again with the neon colour.


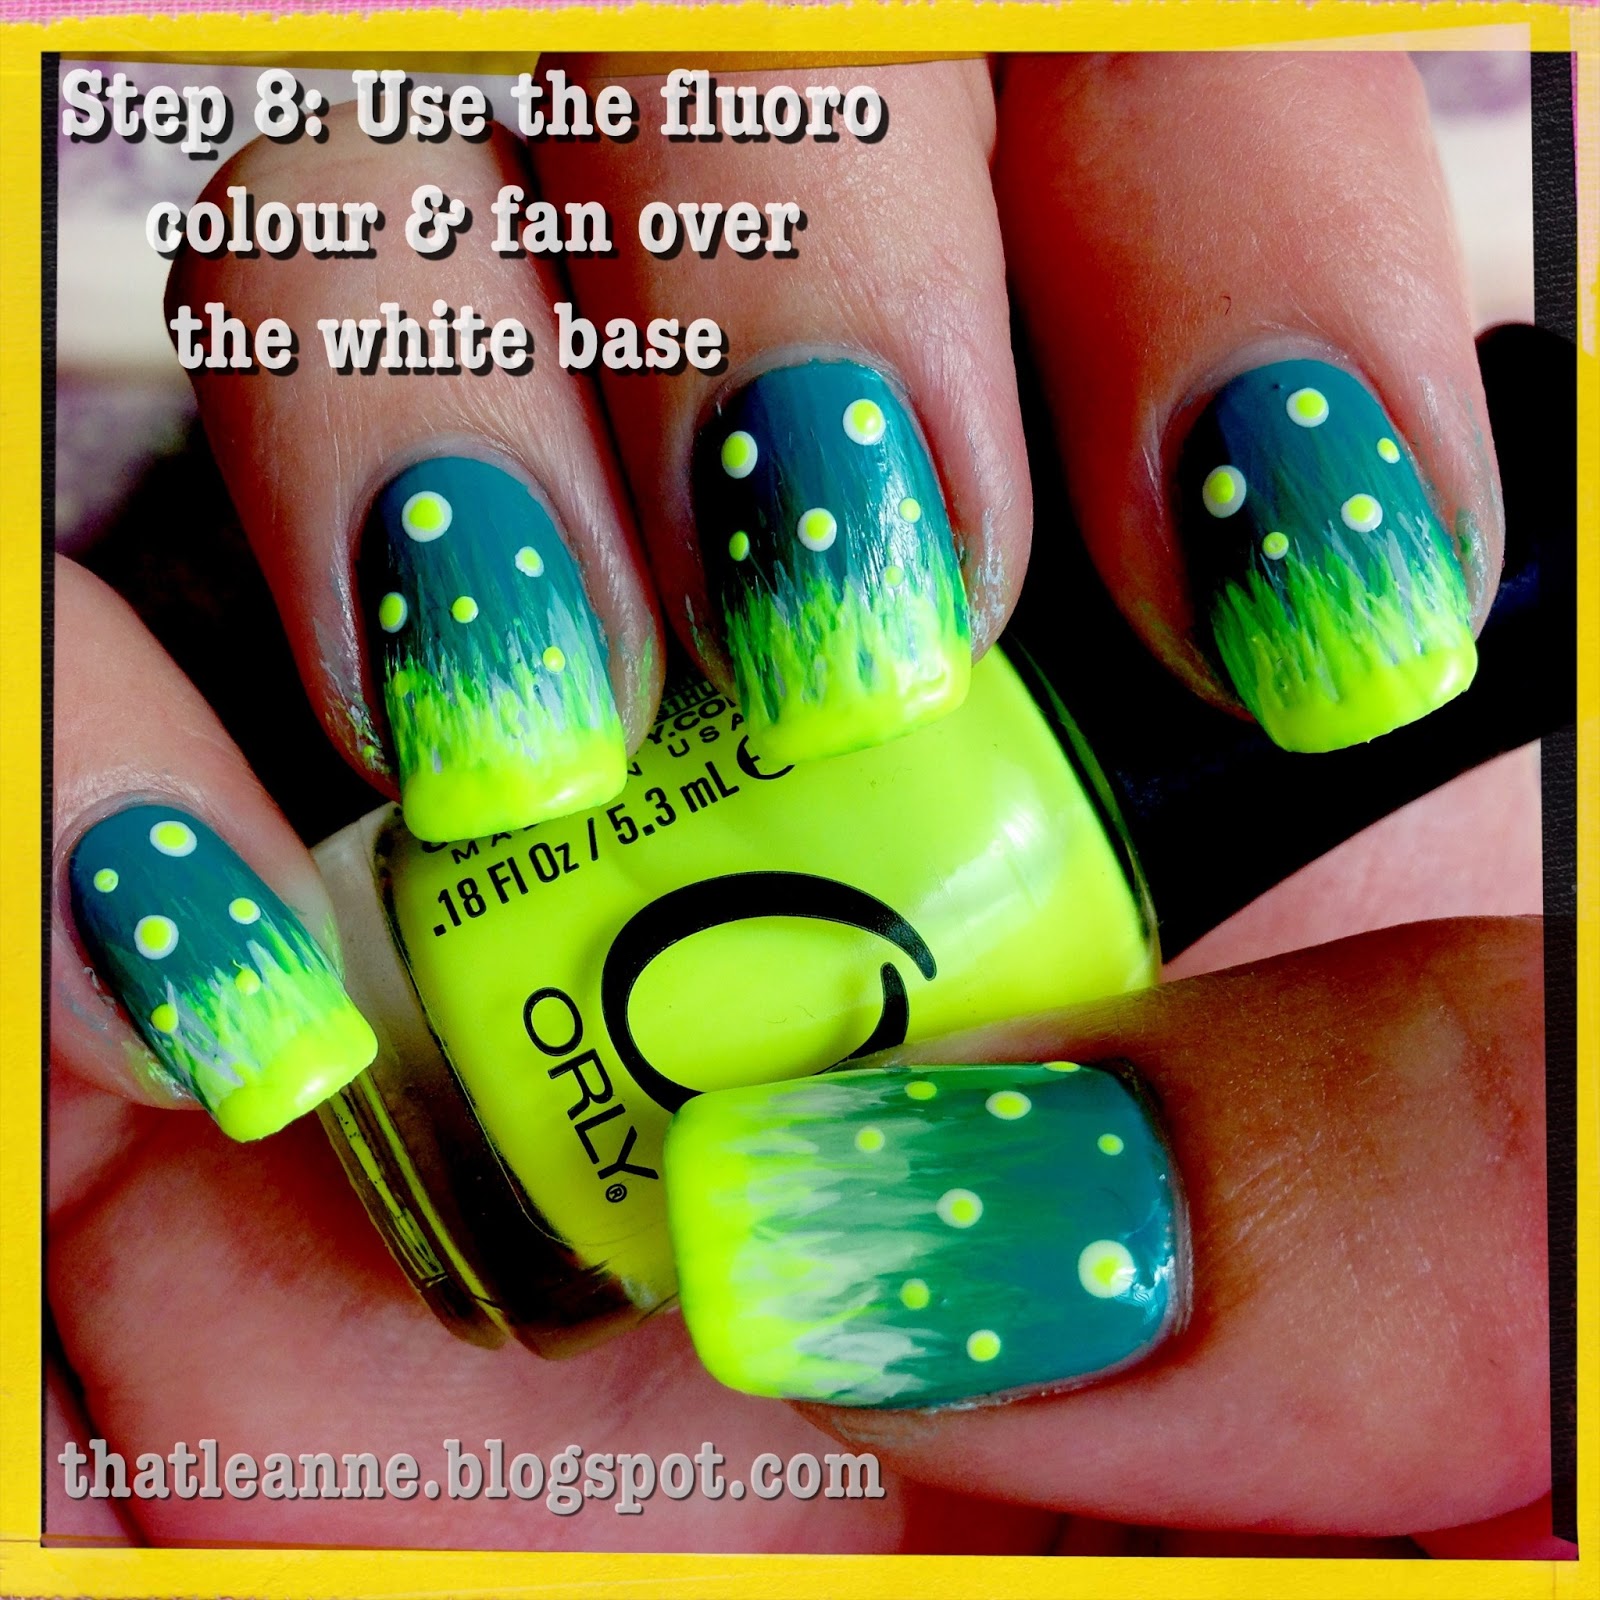
Step 8: Final fan brush over the white base and fill more at the tips so it's nice and opaque. Use the nail polish brush for the tips if necessary.


Step 9: Clean up around the nails with nail polish remover and add a top coat! I use Sally Hansen Double Duty Base & Top Coat.


And that's what it looks like in sunlight, bright as can be! We went out for a late lunch on the lake and it was such nice weather. Although you can feel winter coming...

Well that is it for the fireflies slash bubbly pit tutorial! I  hope you enjoyed the look and I'll see you next time...

Wednesday, March 27, 2013

Easy Easter Egg Nail Art How To!

Hi everyone, it's time for the 2013 Easter Egg mani. For this look I wanted beautiful pastels and what better collection to use than the butter London 2013 Spring collection (despite the fact it's autumn/fall here :-) 4 of the colours made for a simple yet beautiful Easter egg nail art:


Butter London have 6 spring shades out and while I originally bought the purple, pink and yellow, I just had to have the mint green and some others... but here we have the four used in the look above, all prettied up with my new Easter decor from Bed Bath and Table:


No filters have been applied in the first nail art image at the top of this post so use that as your guide. I would swatch but I have eggs on my nails ;-) The pink is called Fruit Machine. Hmm is that related to the Neopets Fruit Machine I wonder (which I WON this week after 10 years of playing, hmph I mean yay?) The yellow is called Jasper, the purple Molly-Coddled and the mint green is called Fiver. Beautiful opaque cremes but I would say that the yellow needs a white base if being painted over another colour.


Step 1: Paint your base colour. I chose Molly-Coddled, the purple because I love purple, no other reason! It applied beautifully opaque in two coats. Cleaned up really nicely too. Can't say that about all polishes.


Step 2: Draw a white base in a half egg shape. Ideally use a small nail art brush (or even a mini polish brush) to draw the outline and fill with your regular paint brush.


Step 3: Repeat step 2 but leaving a small white border to make the yellow pop a bit more. Also, the yellow wasn't as opaque as the other colours and needed a white base to really bring out the yellow. But you could choose any colour as your egg colour.


Step 4: Take a small nail art brush and draw short zigzags or continuous Ms from one side of the egg to the other. Somewhere in the middle ideally, mine were a bit too high up I think. I chose The pink for the top zigzag. Fruit Machine is beautiful, I really need to wear it on its own.


Step 5: Repeat step 4 just under the first zigzag with another colour. I choose the mint green Fiver.


Step 6: Use the large end of the dotting tool to dot below and above the zigzags. The last step is to switch to the smaller end of the dotting tool and fill with your desired colours. I went pink on top and mint green on bottom, ties it all together nicely. And that is it!


And lastly we have my Easter haul. Please someone hide my credit card, Bed Bath and Table had 50% off their Easter range and I got a few things :-) They are actually for my wedding next year! The eggs were the only real Eastery thing I bought, the rest were just pretty and pink. Of course there are some new OPIs (I needed a new Alpine Snow and I bought a full size of Don't Burst My Bubble as I plan to use it for my wedding day). Aaaand I bought two new season Pandora charms, sigh.

Well I hope you enjoyed the post and hope you have a wonderful Easter long weekend! Until next time...

Saturday, February 11, 2012

Valentines Bow Nail Art How To

Valentines Day is coming up this week so I decided to bust out the pinks and draw some pretty bows. This has been done time and time again but I couldn't resist! And I wanted to use the hot pink Zoya Ali that I picked up from Ulta last year (and still hadn't touched). So I came up with this:


Zoya Ali is a hot hot pink that looks red on the nails but over white comes out very fluro pink as you can see on the bow:


Can you believe it's the same colour!? It's much more pink in real life, the flash makes it a lot warmer and I couldn't adjust the white balance enough to make true to colour. Fluro pink is hard to pick up on camera. It makes me wonder if this is the 'Ali' used in the Pretty Little Liars intro where they paint the dead girl's nails since her name was Ali. I should google it. Oh there is a whole site dedicated to the nail polish of PLL! Wow! Hmm I don't know, the base nails in the picture sort of look white enough to bring out the fluro-ness but the formula isn't that thick. This polish came out Summer 2009 and the show started in 2010. But I digress, this was three coats of Zoya Ali. I got a little distracted haha ;-)


Firstly I dotted the centre of the bow with OPI Alpine Snow. I used a dotter on the other nails but I drew it on the thumb as it needed to be a bit bigger.


Then with my trusty nail art brush I drew the two sides of the bow, outlines first.


Then I filled the bows.


This 'last' step is probably the most time consuming part. I shaped my brush to a very fine tip with nail polish remover and carefully dipped the brush in the polish and lightly drew the bow detail. I started with the dots in the middle then worked on the little ovals down the bottom and finally worked around the outline set by the white. Added some strokes in the middle to make it look 'creased' then that was it! It looks a lot harder than it was, it was just drawing fine lines.

I also decided against adding the ribbon hanging down on the nails because I thought I didn't have enough room. If I started my bows higher up I might have been able to make it work. Instead I'll keep the thumb as the 'feature nail'.

Anyway I hope you enjoyed the look and have a fabulous Valentines day if you celebrate it :-) We will probably go for a picnic next weekend since the weather this weekend has been too rainy. I plan to consume a lot of cheese, weeeee. See you next time!

Tuesday, December 20, 2011

Snowman Nail Art How To!

Hey everyone! I am avoiding packing for a road trip so I thought I'd post my latest holiday nails, snow men! Oh and share a picture of my latest Pandora bracelet, I got a snowman charm :-D


My little snowman came as part of a set:


I got this toy box full of mini holiday toys and they all play tunes or sounds. The snowman plays frosty the snowman, too cute. There was also an elf, reindeer and a Santa. I decided to do snowman nails. Onto the nail art!


The base for this look is Essie Lapis of Luxury.


To start with, I drew semi circles with a small nail art brush and OPI Alpine Snow.


Then on top of the snowman base, I drew circles for heads. I kind of stuffed the middle finger but not to worry, it will look fine later!


Then with the same nail art brush, I carefully drew a rounded square on top the head for a top hat, then some feet sticking out to make it look more hat shaped.


Then with an Orly dotting tool (the smaller end) I used black to dot the eyes. I believe the black I am using is one of the minis from one of those OPI Halloween mini sets.


Then using the closest orange I could find lying around I painted small triangles for the nose with the same nail art brush. This happens to be Yes, Your Lioness from the Sarfari Luxe mini set.


Then using the dotter again, did the mouth as dots (even though my snowman plush had a solid line, I think dots are cute).


More dots again on his body with the same small end of the dotting tool.


I personally thought my snowman looked cold so I gave him a scarf using Essie Pretty Edgy.


And lastly added some snowy dots in the background, and we're all done!


I finally jumped on the Instagram bandwagon and posted a piccy! I will be posting more throughout my holidays, so if you're into Instagram checkout Nail :-)


Now I mentioned I got a Pandora charm and this is it! I think they look similar, I just couldn't resist going in and having a looksy at some charms. I was going to get the tree but ended up deciding on the snowman instead.


The last time I shared my Pandora bracelet was back in June so I have a few more additions to share! Hmm let's see, I have acquired the snowman, a kitty cat from my mum for my birthday, a snowflake and a cameo butterfly. LOVE the cameo charms, they are so lovely. I picked that butterfly up in the shopping center in Santa Monica - the one near 3rd street promenade. I saw it and had to have it! I was short on suitcase space but still had cash to spend on my last day. Jewelry seemed to be the way to go!

I actually have the Pandora app on my iPhone and I spend a LOT of time there perusing charms. One day I will have a gold bracelet... one day!

Anyway I hope you enjoyed the post and are either on holidays or close to being on your holiday break! I am going to go finish packing now and wrap a few last minute gifts. I hope you all have a FANTASTIC Christmas/holiday and I will see you in the near future!

Wednesday, October 26, 2011

Glow in the dark ghost nail art for Halloween!

Hey everyone! I am going away this weekend so I thought I'd post another Halloween nail art look earlier than usual. This time we have a plain ole ghost with a twist - it glows in the dark! Looks awesome with or without the glow in the dark polish:


If you're interested in seeing how I created this look, keep reading!


The materials used for this look were pretty simple. Left to right we have OPI Zom-body to Love, I Only Date Werewolves and Alpine Snow. I also use the same small nail art brush as usual. Let's get started!


To start off I painted my nails with two coats of OPI I Only Date Werewolves and cleaned the edges a little.


Next I just googled ghosts and tried to find some cute cartoons of ghosts. I tried a few designs before I was happy with this one. At this stage I simply took the nail art brush and did a rough outline of the ghost in OPI Alpine Snow. It does not need to be super neat as the white will be filled and you can always tidy the outer edges with more black.


After the outline was done I filled with the same brush.


When the white was dry I used the same nail art brush to draw the eyes of the ghost on each nail. The left eye was slightly smaller and rounder than the right eye. And they were kind of jelly bean shaped on the right.


After the eyes I drew a larger sort of jelly bean shape for the mouth. And you could stop there! The white against black is simple and effective. But if you want glowy nails, continue on...


Next I tested one nail with the glow in the dark polish to make sure a light layer was effective for the glow. You only need a thin layer of glow in the dark polish, you don't need full on green (or whatever colour glow in the dark polish you are using).


This is what it looks like with a thin layer of Zom-Body To Love. I used the same nail art brush to lightly go over the white parts of the ghost (being careful going around the eyes and mouth!) It would be great if I used a clear glow in the dark polish as the green doesn't look as good as white. I don't know if that exists!


And that is it! Looks a little scream-ish now that I'm staring at the glow in the dark version. Simple ghost nails for halloween that glow in the dark! I spent a lot of time playing with the manual settings on my camera and have a variety of shots but I liked the full dark shot the best.

Anyway I hope you enjoyed this look and try it out. I'm off to Brisbane for the weekend so I will see you on my return! Have a lovely week and weekend everyone :-)